本文提供相关源码,请放心食用,详见网页侧边栏或底部,有疑问请评论或 Issue
一、发送即时消息
1.1 添加依赖包
这里我们不使用网上大多数的 spring-boot-starter-activemq,因为我配的时候总是有问题,我改为使用如下的三个依赖包,分别是 activemq连接池包、activemq包 和 jms包:
1
2
3
4
5
6
7
8
9
10
11
12
13
14
15
16
|
<dependency>
<groupId>org.apache.activemq</groupId>
<artifactId>activemq-pool</artifactId>
<version>5.15.3</version>
</dependency>
<dependency>
<groupId>org.springframework</groupId>
<artifactId>spring-jms</artifactId>
</dependency>
<dependency>
<groupId>org.apache.activemq</groupId>
<artifactId>activemq-all</artifactId>
<version>5.13.3</version>
</dependency>
|
1.2 添加配置信息
在配置文件 application.properties 中,添加配置信息:
application.properties1
2
3
4
5
6
7
8
9
10
11
12
13
14
|
spring.activemq.in-memory=false
spring.activemq.broker-url=tcp://192.168.30.188:61616
spring.activemq.close-timeout=500ms
spring.activemq.send-timeout=3000ms
spring.activemq.pool.enabled=true
spring.activemq.pool.max-connections=100
spring.activemq.pool.idle-timeout=30s
|
1.3 编写 Producer
编写 MQProducer 类用于提供通用的 Producer。首先为该类添加 @Component 注解加入容器,然后将 JmsMessagingTemplate 注入进来,它用于消息的发送,它构建于 JmsTemplate 顶部,并提供了消息抽象的集成。在方法中调用 JmsMessagingTemplate 的 convertAndSend() 方法就能实现消息的发送。
1
2
3
4
5
6
7
8
9
10
11
12
13
14
15
16
17
18
19
20
21
22
23
24
25
26
| import org.springframework.beans.factory.annotation.Autowired;
import org.springframework.jms.core.JmsMessagingTemplate;
import org.springframework.stereotype.Component;
import javax.jms.Destination;
@Component
public class MQProducer {
@Autowired
private JmsMessagingTemplate jmsMessagingTemplate;
public void send(Destination destination, String message){
jmsMessagingTemplate.convertAndSend(destination,message);
}
}
|
1.4 发送消息
假设我们要发送一个名为 test-queue 的点对点消息,让我们编写一个方法,并在其中实现消息的发送。
编写一个 Controller,并在其中将 MQProducer 注入进来,调用其 send() 方法。
1
2
3
4
5
6
7
8
9
10
11
12
13
14
15
16
17
18
19
20
21
22
23
24
25
26
| import org.apache.activemq.command.ActiveMQQueue;
import org.springframework.beans.factory.annotation.Autowired;
import org.springframework.web.bind.annotation.GetMapping;
import org.springframework.web.bind.annotation.PathVariable;
import org.springframework.web.bind.annotation.RestController;
import javax.jms.Destination;
@RestController
public class MQController {
@Autowired
private MQProducer producer;
@GetMapping("/queue/{info}")
public void sendQueue(@PathVariable String info) {
Destination destination = new ActiveMQQueue("test-queue");
producer.send(destination,info);
}
}
|
1.5 编写 Consumer
消息是发出去了,但是现在还没有 Consumer 来消费,让我们创建一个 Consumer。
创建 TestQueueConsumer 类,也要添加 @Component 注解加入容器,写一个接收方法,在方法上加入 @JmsListener 注解,用于指定要接收 destination 的名称:
1
2
3
4
5
6
7
8
9
10
11
12
13
14
15
16
| import org.springframework.jms.annotation.JmsListener;
import org.springframework.stereotype.Component;
@Component
public class TestQueueConsumer {
@JmsListener(destination = "test-queue")
public void receiveQueue(String text) {
System.out.println("接收到消息:" + text);
}
}
|
大功告成,让我们测试一下:

二、发送延时消息
下面再说一个如何发送延时消息,该功能可以实现指定多少秒后发送消息。例如在电商网站中举办抢购活动,用户点击了抢购前提醒功能,那么我们设置延时消息,在活动开始前提醒用户。
2.1 开启延时消息
ActiveMQ 默认没有开启延时消息,编辑 activemq 目录下的 conf/activemq.xml 文件,修改第 20 行,在末尾加上 schedulerSupport="true",如图所示:
重新启动 ActiveMQ(./activemq restart)即可。
2.2 编写发送延时消息的方法
在 MQProducer 中,新增一个 delaySend() 方法,用于发送延时消息:
1
2
3
4
5
6
7
8
9
10
11
12
13
14
15
16
17
18
|
public void delaySend(Destination destination,String message, Long time) {
JmsTemplate jmsTemplate = jmsMessagingTemplate.getJmsTemplate();
jmsTemplate.send(destination, session -> {
TextMessage textMessage = session.createTextMessage(message);
textMessage.setLongProperty(ScheduledMessage.AMQ_SCHEDULED_DELAY, time);
return textMessage;
});
}
|
2.3 测试延时消息
在 Controller 中新增一个方法,用于测试延时消息:
1
2
3
4
5
6
7
8
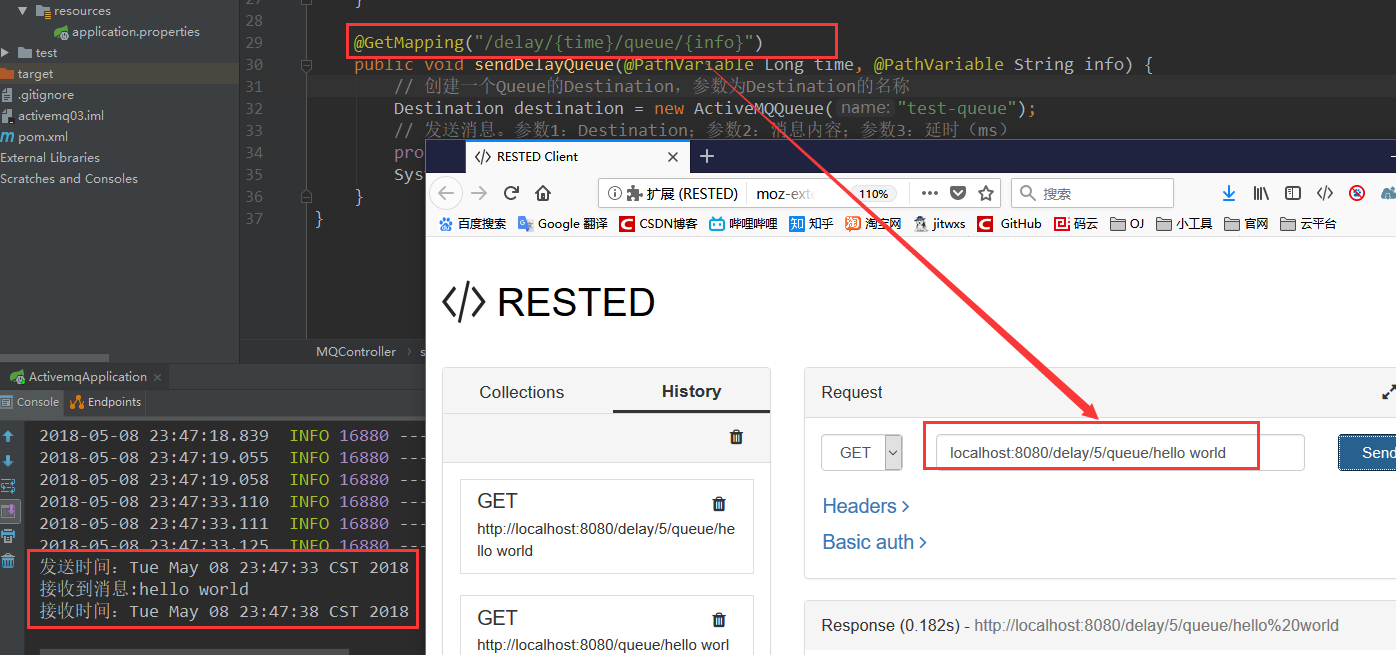
| @GetMapping("/delay/{time}/queue/{info}")
public void sendDelayQueue(@PathVariable Long time, @PathVariable String info) {
Destination destination = new ActiveMQQueue("test-queue");
producer.delaySend(destination,info,time * 1000);
System.out.println("发送时间:" + new Date());
}
|
为了体现效果,我在最后一行打印了当前时间,让我们也在接收者那边加一行打印时间:
1
2
3
4
5
6
|
@JmsListener(destination = "test-queue")
public void receiveQueue(String text) {
System.out.println("接收到消息:" + text);
System.out.println("接收时间:" + new Date());
}
|
大功告成,测试一下:
在参数中,设置了延时5s,消息内容为hello world,输出结果正确!
ActiveMQ 初探(3)——与 SpringBoot 整合