Elasticsearch的一大优势就是能够十分轻松的进行分布式/集群部署,本文将主要讲解Elastic的集群搭建。

一、基础概念

1. 1 节点类型

node.master node.data 节点类型
true(default) true(default) 候选主节点 && 数据节点
true false 候选主节点
false true 数据节点
false false 客户端节点

1.1.1 候选主节点(Master-eligible node)

一个节点启动后,就会使用Zen Discovery机制去寻找集群中的其他节点,并与之建立连接。集群中会从候选主节点中选举出一个主节点,主节点负责创建索引、删除索引、分配分片、追踪集群中的节点状态等工作。Elasticsearch中的主节点的工作量相对较轻,用户的请求可以发往任何一个节点,由候选主节点节点负责分发和返回结果,而不需要经过主节点转发。

正常情况下,集群中的所有节点,应该对主节点的选择是一致的,即一个集群中只有一个选举出来的主节点。然而,在某些情况下,比如网络通信出现问题、主节点因为负载过大停止响应等等,就会导致重新选举主节点,此时可能会出现集群中有多个主节点的现象,即节点对集群状态的认知不一致,称之为脑裂现象。为了尽量避免此种情况的出现,可以通过discovery.zen.minimum_master_nodes来设置最少可工作的候选主节点个数,建议设置为 候选主节点数 / 2 + 1,也就是保证集群中有半数以上的候选主节点。

候选主节点的设置方法是设置node.mater为true,默认情况下,node.mater和node.data的值都为true,即该节点既可以做候选主节点也可以做数据节点。由于数据节点承载了数据的操作,负载通常都很高,所以随着集群的扩大,建议将二者分离,设置专用的候选主节点。当我们设置node.data为false,就将节点设置为专用的候选主节点了。

1
2
node.master = true
node.data = false

1.1.2 数据节点(Data node)

数据节点负责数据的存储和相关具体操作,比如CRUD、搜索、聚合。所以,数据节点对机器配置要求比较高,首先需要有足够的磁盘空间来存储数据,其次数据操作对系统CPU、Memory和IO的性能消耗都很大。通常随着集群的扩大,需要增加更多的数据节点来提高可用性。

前面提到默认情况下节点既可以做候选主节点也可以做数据节点,但是数据节点的负载较重,所以需要考虑将二者分离开,设置专用的数据节点,避免因数据节点负载重导致主节点不响应。

1
2
node.master = false
node.data = true

1.1.3 客户端节点(Client node)

客户端节点就是既不做候选主节点也不做数据节点的节点,只负责请求的分发、汇总等等,也就是下面要说到的协调节点的角色。这样的工作,其实任何一个节点都可以完成,单独增加这样的节点更多是为了负载均衡。

1
2
node.master = false
node.data = false

1.1.4 协调节点(Coordinating node)

协调节点,是一种角色,而不是真实的Elasticsearch的节点,你没有办法通过配置项来配置哪个节点为协调节点。集群中的任何节点,都可以充当协调节点的角色。当一个节点A收到用户的查询请求后,会把查询子句分发到其它的节点,然后合并各个节点返回的查询结果,最后返回一个完整的数据集给用户。在这个过程中,节点A扮演的就是协调节点的角色。毫无疑问,协调节点会对CPU、Memory要求比较高。
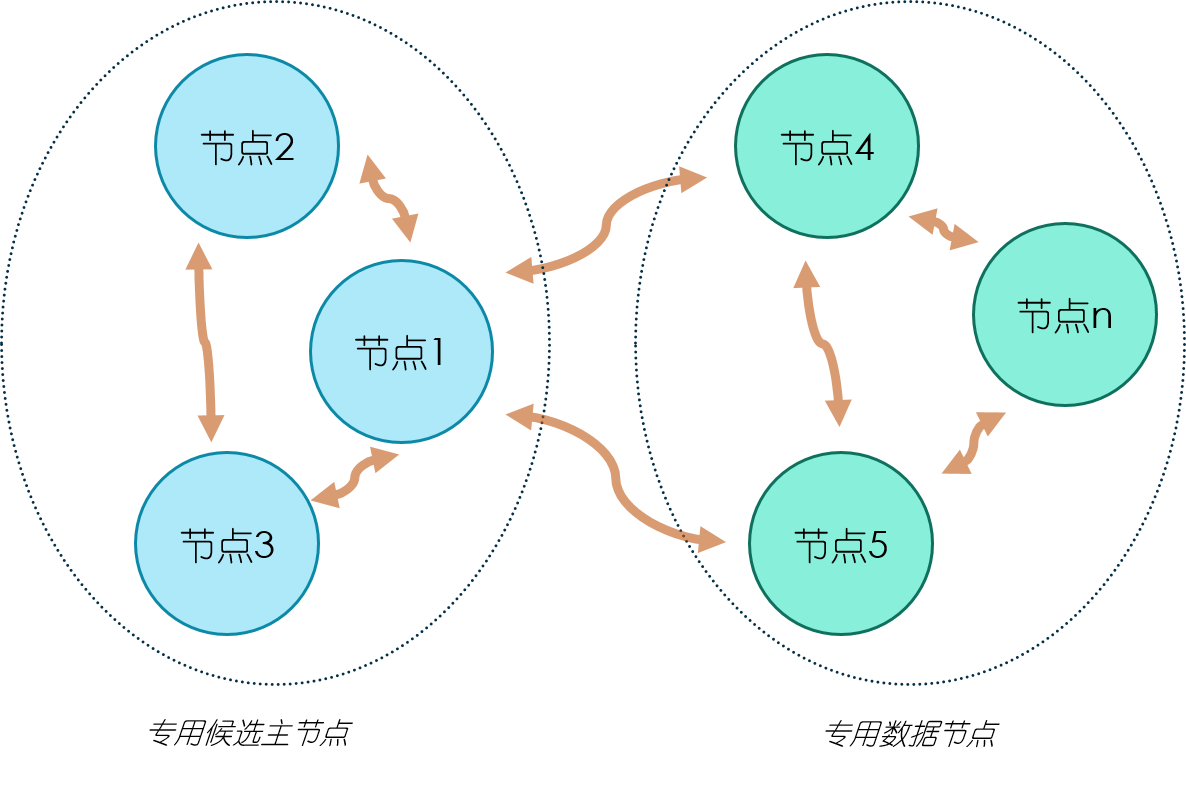
1.2 拓扑结构

拓扑图一是一个简单的集群部署,适用于数据量较小的场景。集群中有三个节点,三个都是候选主节点,因此我们可以设置最少可工作候选主节点个数为2。节点1和2同时作为数据节点,两个节点的数据相互备份。

拓扑图1

这样的部署结构在扩展过程中,通常是先根据需要逐步加入专用的数据节点,最后考虑将数据节点和候选主节点分离,也就发展为了拓扑图二的结构。在拓扑图二中,有三个专用的候选主节点,用来做集群状态维护,数据节点根据需要进行增加,注意只增加专用的数据节点即可。

拓扑图2

二、集群搭建

2.1 拷贝副本

本次以搭建三节点的单机集群为例,拷贝出两份副本,如图所示。然后清理两份副本中的datalogs文件夹下的所有内容,否则启动集群是会报failed to send join request to master...的错误。

2.2 修改配置文件

因为只是一个三节点的例子,就不在手动配置候选主节点和数据节点。如果需要,在配置文件中设置node.masternode.data的值即可。

修改每个节点的config/elasticsearch.yml文件:

1
2
3
4
5
6
7
8
9
10
11
12
13
14
15
16
17
18
19
20
21
22
23
24
25
26
27
28
29
30
31
32
33
34
35
36
37
38
39
40
41
42
43
44
45
46
47
48
49
50
51
52
53
54
55
56
57
58
59
60
61
62
63
64
65
66
67
68
69
70
71
72
73
74
75
76
77
78
79
80
81
82
83
84
85
86
87
88
89
90
91
92
93
94
95
96
97
98
99
100
101
102
# ======================== Elasticsearch Configuration =========================
#
# NOTE: Elasticsearch comes with reasonable defaults for most settings.
# Before you set out to tweak and tune the configuration, make sure you
# understand what are you trying to accomplish and the consequences.
#
# The primary way of configuring a node is via this file. This template lists
# the most important settings you may want to configure for a production cluster.
#
# Please consult the documentation for further information on configuration options:
# https://www.elastic.co/guide/en/elasticsearch/reference/index.html
#
# ---------------------------------- Cluster -----------------------------------
#
# Use a descriptive name for your cluster:
#
cluster.name: my-es-cluster ## 配置项1:这里指定集群的名字。三个节点配置保持一致
#
# ------------------------------------ Node ------------------------------------
#
# Use a descriptive name for the node:
#
node.name: node-1 ## 配置项2:指定节点名称。节点二配置为node-2,节点三配置为node-3
#
# Add custom attributes to the node:
#
node.attr.rack: r1 ## 配置项3:指定节点的机架属性,这是一个比集群更大的范围。三个节点配置保持一致
#
# ----------------------------------- Paths ------------------------------------
#
# Path to directory where to store the data (separate multiple locations by comma):
#
#path.data: /path/to/data
#
# Path to log files:
#
#path.logs: /path/to/logs
#
# ----------------------------------- Memory -----------------------------------
#
# Lock the memory on startup:
#
#bootstrap.memory_lock: true
#
# Make sure that the heap size is set to about half the memory available
# on the system and that the owner of the process is allowed to use this
# limit.
#
# Elasticsearch performs poorly when the system is swapping the memory.
#
# ---------------------------------- Network -----------------------------------
#
# Set the bind address to a specific IP (IPv4 or IPv6):
#
network.host: 127.0.0.1 ## 配置项4:节点的IP地址。对于单机集群每个节点都是127.0.0.1;对于多机集群,为各个节点的IP地址
#
# Set a custom port for HTTP:

## 配置项5:配置节点http端口和tcp端口。
## (1)对于单机集群,每个节点需要通过端口号区分。
## 节点二配置为:http.port: 9201 transport.tcp.port: 9301
## 节点三配置为:http.port: 9202 transport.tcp.port: 9302
## (2)对于多机集群,每个节点通过IP区分即可,因此无需更改http.port和transport.tcp.port,使用默认值9200和9300即可。
http.port: 9200
transport.tcp.port: 9300
#
# For more information, consult the network module documentation.
#
# --------------------------------- Discovery ----------------------------------
#
# Pass an initial list of hosts to perform discovery when new node is started:
# The default list of hosts is ["127.0.0.1", "[::1]"]
#
## 配置项6:设置集群中其他节点的IP地址。
## (1)对于单机集群,填写IP地址: transport.tcp.port的值即可。三个节点保持一致
## (2)对于多机集群,填写IP地址:9300即可(注:9300是默认的 transport.tcp.port值,如果手动设置了其他值,更换为设置值)
discovery.zen.ping.unicast.hosts: ["127.0.0.1:9300", "127.0.0.1:9301", "127.0.0.1:9302"]
#
# Prevent the "split brain" by configuring the majority of nodes (total number of master-eligible nodes / 2 + 1):
#
## 配置项7:最小主节点数,预防脑裂,遵循 候选主节点数 / 2 + 1的原则。三个节点保持一致
discovery.zen.minimum_master_nodes: 2
#
# For more information, consult the zen discovery module documentation.
#
# ---------------------------------- Gateway -----------------------------------
#
# Block initial recovery after a full cluster restart until N nodes are started:
#
#gateway.recover_after_nodes: 3
#
# For more information, consult the gateway module documentation.
#
# ---------------------------------- Various -----------------------------------
#
# Require explicit names when deleting indices:
#
#action.destructive_requires_name: true

## 配置项8:跨域,配合head插件。三个节点保持一致
http.cors.enabled: true
http.cors.allow-origin: "*"

我就配了以上8个地方,更多配置参考官方文档,需要注意的地方有:

  1. 如果运行集群报java.io.CharConversionException: Invalid UTF-8 start byte...的错误,删除配置文件中的中文。

  2. 配置文件书写的时候属性必须顶格写,之后是一个英文冒号,之后空格,然后是属性值。不能使用tab键。

  3. 如果报failed to send join request to master...的错误,清除拷贝的两个副本的datalogs文件夹内容。

2.3 运行集群

分别运行三个节点的bin/elasticsearch.bat,如果手动指定了候选主节点,优先启动候选主节点。(因为我这里没有手动设置,所以随意启动即可)

启动后使用head插件查看:

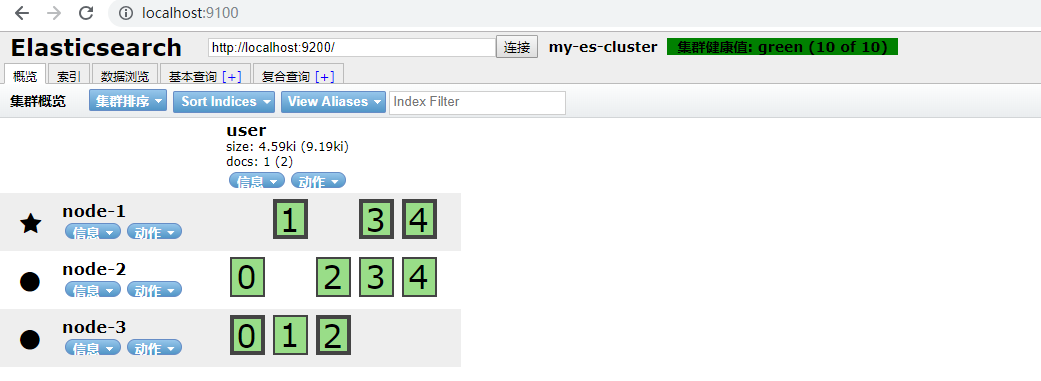
可以看到我们之前创建的索引user的五个分片和一个备份被分散存储到各个节点上。