SpringBoot 集成 Spring Security(8)——短信验证码登录 | 字数总计: 3.4k | 阅读时长: 14分钟 | 阅读量:
本文提供相关源码,请放心食用,详见网页侧边栏或底部,有疑问请评论或 Issue
经过前面七章的学习,我们已经算入门 Spring Security 了,下面我们学习如何对 Spring Security 进行扩展,来实现短信验证码方式登录。
注意:
为了方便讲解,本篇文章代码直接在 《SpringBoot集成Spring Security(1)——入门程序》 上进行开发。
并且为了省去与本篇主题无关的代码,短信验证码只是一个模拟 。如果你需要具体的实际例子,在下面的源码链接中除了包括每一章的代码外,还包括从头到尾的完整整合代码,方便大家参考学习。
在开始编码前,先理解下短信验证码的实现流程。如果你能对《SpringBoot集成Spring Security(7)——认证流程》 这篇文章有一定的了解的话,那么这篇文章的学习你会轻松许多。
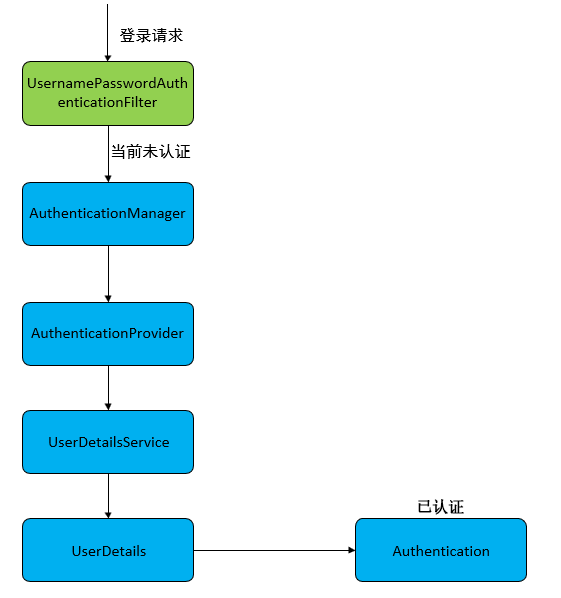
废话不多说,在上一篇文章中,以标准的用户名密码登录为例,讲解了整个认证流程。大致流程如下:
先进入 UsernamePasswordAuthenticationFilter 中,根据输入的用户名和密码信息,构造出一个暂时没有鉴权的 UsernamePasswordAuthenticationToken,并将 UsernamePasswordAuthenticationToken 交给 AuthenticationManager 处理。
AuthenticationManager 本身并不做验证处理,他通过 for-each 遍历找到符合当前登录方式的一个 AuthenticationProvider,并交给它进行验证处理,对于用户名密码登录方式,这个 Provider 就是 DaoAuthenticationProvider。在这个 Provider 中进行一系列的验证处理,如果验证通过,就会重新构造一个添加了鉴权的 UsernamePasswordAuthenticationToken,并将这个 token 传回到 UsernamePasswordAuthenticationFilter 中。
在该 Filter 的父类 AbstractAuthenticationProcessingFilter 中,会根据上一步验证的结果,跳转到 successHandler 或者是 failureHandler。
我们可以仿照用户名密码登录的逻辑,来实现短信验证码的登陆逻辑。
用户名密码登录有个 UsernamePasswordAuthenticationFilter ,我们搞一个 SmsAuthenticationFilter,代码粘过来改一改。
用户名密码登录需要 UsernamePasswordAuthenticationToken,我们搞一个 SmsAuthenticationToken,代码粘过来改一改。
用户名密码登录需要 DaoAuthenticationProvider,我们模仿它也 implenments AuthenticationProvider,叫做 SmsAuthenticationProvider。
我们自己搞了上面三个类以后,想要实现的效果如上图所示。当我们使用短信验证码登录的时候:
先经过 SmsAuthenticationFilter,构造一个没有鉴权的 SmsAuthenticationToken,然后交给 AuthenticationManager 处理。
AuthenticationManager 通过 for-each 挑选出一个合适的 provider 进行处理,当然我们希望这个 provider 要是 SmsAuthenticationProvider。
验证通过后,重新构造一个有鉴权的 SmsAuthenticationToken,并返回给 SmsAuthenticationFilter。
filter 根据上一步的验证结果,跳转到成功或者失败的处理逻辑。
请通过 github 链接下载第一章代码,或者参看《SpringBoot集成Spring Security(1)——入门程序》 初始化项目,这里就不再赘述了。
首先我们编写 SmsAuthenticationToken,这里直接参考 UsernamePasswordAuthenticationToken 源码,直接粘过来,改一改。
步骤:
principal 原本代表用户名,这里保留,只是代表了手机号码。credentials 原本代码密码,短信登录用不到,直接删掉。SmsCodeAuthenticationToken() 两个构造方法一个是构造没有鉴权的,一个是构造有鉴权的。剩下的几个方法去除无用属性即可。
1
2
3
4
5
6
7
8
9
10
11
12
13
14
15
16
17
18
19
20
21
22
23
24
25
26
27
28
29
30
31
32
33
34
35
36
37
38
39
40
41
42
43
44
45
46
47
48
49
50
51
52
53
54
55
56
57
58
59
60
61
62
63
64
65
import org.springframework.security.authentication.AbstractAuthenticationToken;import org.springframework.security.core.GrantedAuthority;import org.springframework.security.core.SpringSecurityCoreVersion;import java.util.Collection;public class SmsCodeAuthenticationToken extends AbstractAuthenticationToken private static final long serialVersionUID = SpringSecurityCoreVersion.SERIAL_VERSION_UID; private final Object principal; public SmsCodeAuthenticationToken (Object principal) super (null ); this .principal = principal; setAuthenticated(false ); } public SmsCodeAuthenticationToken (Object principal, Collection<? extends GrantedAuthority> authorities) super (authorities); this .principal = principal; super .setAuthenticated(true ); } @Override public Object getCredentials () return null ; } @Override public Object getPrincipal () return this .principal; } @Override public void setAuthenticated (boolean isAuthenticated) throws IllegalArgumentException if (isAuthenticated) { throw new IllegalArgumentException( "Cannot set this token to trusted - use constructor which takes a GrantedAuthority list instead" ); } super .setAuthenticated(false ); } @Override public void eraseCredentials () super .eraseCredentials(); } }
然后编写 SmsAuthenticationFilter,参考 UsernamePasswordAuthenticationFilter 的源码,直接粘过来,改一改。
步骤:
原本的静态字段有 username 和 password,都干掉,换成我们的手机号字段。
SmsCodeAuthenticationFilter() 中指定了这个 filter 的拦截 Url,我指定为 post 方式的 /sms/login。剩下来的方法把无效的删删改改就好了。
1
2
3
4
5
6
7
8
9
10
11
12
13
14
15
16
17
18
19
20
21
22
23
24
25
26
27
28
29
30
31
32
33
34
35
36
37
38
39
40
41
42
43
44
45
46
47
48
49
50
51
52
53
54
55
56
57
58
59
60
61
62
63
64
65
66
67
68
69
70
71
72
73
74
75
76
import org.springframework.security.authentication.AuthenticationServiceException;import org.springframework.security.core.Authentication;import org.springframework.security.core.AuthenticationException;import org.springframework.security.web.authentication.AbstractAuthenticationProcessingFilter;import org.springframework.security.web.util.matcher.AntPathRequestMatcher;import org.springframework.util.Assert;import javax.servlet.http.HttpServletRequest;import javax.servlet.http.HttpServletResponse;public class SmsCodeAuthenticationFilter extends AbstractAuthenticationProcessingFilter public static final String SPRING_SECURITY_FORM_MOBILE_KEY = "mobile" ; private String mobileParameter = SPRING_SECURITY_FORM_MOBILE_KEY; private boolean postOnly = true ; public SmsCodeAuthenticationFilter () super (new AntPathRequestMatcher("/sms/login" , "POST" )); } @Override public Authentication attemptAuthentication (HttpServletRequest request, HttpServletResponse response) throws AuthenticationException if (postOnly && !request.getMethod().equals("POST" )) { throw new AuthenticationServiceException( "Authentication method not supported: " + request.getMethod()); } String mobile = obtainMobile(request); if (mobile == null ) { mobile = "" ; } mobile = mobile.trim(); SmsCodeAuthenticationToken authRequest = new SmsCodeAuthenticationToken(mobile); setDetails(request, authRequest); return this .getAuthenticationManager().authenticate(authRequest); } protected String obtainMobile (HttpServletRequest request) return request.getParameter(mobileParameter); } protected void setDetails (HttpServletRequest request, SmsCodeAuthenticationToken authRequest) authRequest.setDetails(authenticationDetailsSource.buildDetails(request)); } public String getMobileParameter () return mobileParameter; } public void setMobileParameter (String mobileParameter) Assert.hasText(mobileParameter, "Mobile parameter must not be empty or null" ); this .mobileParameter = mobileParameter; } public void setPostOnly (boolean postOnly) this .postOnly = postOnly; } }
这个方法比较重要,这个方法首先能够在使用短信验证码登陆时候被 AuthenticationManager 挑中,其次要在这个类中处理验证逻辑。
步骤:
实现 AuthenticationProvider 接口,实现 authenticate() 和 supports() 方法。
supports() 方法决定了这个 Provider 要怎么被 AuthenticationManager 挑中,我这里通过 return SmsCodeAuthenticationToken.class.isAssignableFrom(authentication),处理所有 SmsCodeAuthenticationToken 及其子类或子接口。authenticate() 方法处理验证逻辑。
首先将 authentication 强转为 SmsCodeAuthenticationToken。
从中取出登录的 principal,也就是手机号。
调用自己写的 checkSmsCode() 方法,进行验证码校验,如果不合法,抛出 AuthenticationException 异常。
如果此时仍然没有异常,通过调用 loadUserByUsername(mobile) 读取出数据库中的用户信息。
如果仍然能够成功读取,没有异常,这里验证就完成了。
重新构造鉴权后的 SmsCodeAuthenticationToken,并返回给 SmsCodeAuthenticationFilter 。
SmsCodeAuthenticationFilter 的父类在 doFilter() 方法中处理是否有异常,是否成功,根据处理结果跳转到登录成功/失败逻辑。
1
2
3
4
5
6
7
8
9
10
11
12
13
14
15
16
17
18
19
20
21
22
23
24
25
26
27
28
29
30
31
32
33
34
35
36
37
38
39
40
41
42
43
44
45
46
47
48
49
50
51
52
53
54
55
56
57
58
59
60
61
62
63
64
65
66
67
68
69
70
71
72
import org.springframework.security.authentication.AuthenticationProvider;import org.springframework.security.authentication.BadCredentialsException;import org.springframework.security.core.Authentication;import org.springframework.security.core.AuthenticationException;import org.springframework.security.core.userdetails.UserDetails;import org.springframework.security.core.userdetails.UserDetailsService;import org.springframework.web.context.request.RequestContextHolder;import org.springframework.web.context.request.ServletRequestAttributes;import javax.servlet.http.HttpServletRequest;import java.util.Map;public class SmsCodeAuthenticationProvider implements AuthenticationProvider private UserDetailsService userDetailsService; @Override public Authentication authenticate (Authentication authentication) throws AuthenticationException SmsCodeAuthenticationToken authenticationToken = (SmsCodeAuthenticationToken) authentication; String mobile = (String) authenticationToken.getPrincipal(); checkSmsCode(mobile); UserDetails userDetails = userDetailsService.loadUserByUsername(mobile); SmsCodeAuthenticationToken authenticationResult = new SmsCodeAuthenticationToken(userDetails, userDetails.getAuthorities()); authenticationResult.setDetails(authenticationToken.getDetails()); return authenticationResult; } private void checkSmsCode (String mobile) HttpServletRequest request = ((ServletRequestAttributes) RequestContextHolder.getRequestAttributes()).getRequest(); String inputCode = request.getParameter("smsCode" ); Map<String, Object> smsCode = (Map<String, Object>) request.getSession().getAttribute("smsCode" ); if (smsCode == null ) { throw new BadCredentialsException("未检测到申请验证码" ); } String applyMobile = (String) smsCode.get("mobile" ); int code = (int ) smsCode.get("code" ); if (!applyMobile.equals(mobile)) { throw new BadCredentialsException("申请的手机号码与登录手机号码不一致" ); } if (code != Integer.parseInt(inputCode)) { throw new BadCredentialsException("验证码错误" ); } } @Override public boolean supports (Class<?> authentication) return SmsCodeAuthenticationToken.class.isAssignableFrom(authentication); } public UserDetailsService getUserDetailsService () return userDetailsService; } public void setUserDetailsService (UserDetailsService userDetailsService) this .userDetailsService = userDetailsService; } }
上面最后说到,在 SmsCodeAuthenticationFilter 的父类,会根据验证结果跳转到成功或失败处理逻辑,现在我们就编写下这个的处理。
这里之前也说过了,直接贴代码了,如果有疑问,请参考《SpringBoot集成Spring Security(6)——登录管理》 。
验证成功处理:
1
2
3
4
5
6
7
8
9
10
11
12
13
14
15
@Component public class CustomAuthenticationSuccessHandler implements AuthenticationSuccessHandler @Autowired private ObjectMapper objectMapper; private Logger logger = LoggerFactory.getLogger(getClass()); @Override public void onAuthenticationSuccess (HttpServletRequest request, HttpServletResponse response, Authentication authentication) throws IOException, ServletException logger.info("登录成功" ); response.setContentType("application/json;charset=UTF-8" ); response.getWriter().write(objectMapper.writeValueAsString(authentication)); } }
验证失败处理:
1
2
3
4
5
6
7
8
9
10
11
12
13
14
15
16
@Component public class CustomAuthenticationFailureHandler implements AuthenticationFailureHandler @Autowired private ObjectMapper objectMapper; private Logger logger = LoggerFactory.getLogger(getClass()); @Override public void onAuthenticationFailure (HttpServletRequest request, HttpServletResponse response, AuthenticationException exception) throws IOException, ServletException logger.info("登陆失败" ); response.setStatus(HttpStatus.INTERNAL_SERVER_ERROR.value()); response.setContentType("application/json;charset=UTF-8" ); response.getWriter().write(objectMapper.writeValueAsString(exception.getMessage())); } }
下面我们需要把我们自己写的这么多类添加进 Spring Security 框架中,在以往,我们都是直接往 WebSecurityConfig 中加,但是这样会导致 WebSecurityConfig 内容太多,难以维护。
因此我们可以为每种登录方式都建议一个专属于它的配置文件,再把这个配置文件加入到 WebSecurityConfig 中,进行解耦。
因此建立短信验证码登录的配置文件 SmsCodeAuthenticationSecurityConfig:
1
2
3
4
5
6
7
8
9
10
11
12
13
14
15
16
17
18
19
20
21
22
23
24
25
26
27
28
29
30
31
32
import org.springframework.beans.factory.annotation.Autowired;import org.springframework.security.authentication.AuthenticationManager;import org.springframework.security.config.annotation.SecurityConfigurerAdapter;import org.springframework.security.config.annotation.web.builders.HttpSecurity;import org.springframework.security.core.userdetails.UserDetailsService;import org.springframework.security.web.DefaultSecurityFilterChain;import org.springframework.security.web.authentication.UsernamePasswordAuthenticationFilter;import org.springframework.stereotype.Component;@Component public class SmsCodeAuthenticationSecurityConfig extends SecurityConfigurerAdapter <DefaultSecurityFilterChain , HttpSecurity > @Autowired private UserDetailsService userDetailsService; @Autowired private CustomAuthenticationSuccessHandler customAuthenticationSuccessHandler; @Autowired private CustomAuthenticationFailureHandler customAuthenticationFailureHandler; @Override public void configure (HttpSecurity http) throws Exception SmsCodeAuthenticationFilter smsCodeAuthenticationFilter = new SmsCodeAuthenticationFilter(); smsCodeAuthenticationFilter.setAuthenticationManager(http.getSharedObject(AuthenticationManager.class)); smsCodeAuthenticationFilter.setAuthenticationSuccessHandler(customAuthenticationSuccessHandler); smsCodeAuthenticationFilter.setAuthenticationFailureHandler(customAuthenticationFailureHandler); SmsCodeAuthenticationProvider smsCodeAuthenticationProvider = new SmsCodeAuthenticationProvider(); smsCodeAuthenticationProvider.setUserDetailsService(userDetailsService); http.authenticationProvider(smsCodeAuthenticationProvider) .addFilterAfter(smsCodeAuthenticationFilter, UsernamePasswordAuthenticationFilter.class); } }
在这个配置文件中,首先给 SmsCodeAuthenticationFilter 指定了:
AuthenticationManager:不指定这个上面的流程图就断掉了。
指定登录成功/失败处理逻辑,方便其父类调用。
然后指定了 SmsCodeAuthenticationProvider,并指定了 UserDetailsService ,方便在验证处理时候通过 loadUserByUsername() 读取出数据库中的用户信息。
最后将 filter 和 provider 都加入 HttpSecurity 配置中。
另外说两句:
开头就说过了,为了方便介绍,写最少的代码,因此这是一个假的短信登录。如果你看这里的 UserDetailsService 的代码话,你会发现它是从数据库中根据 name 获取信息的,我其实就是把用户名来当手机号用。
下面我们就需要把自己写的 SmsCodeAuthenticationSecurityConfig 加入到 WebSecurityConfig 中了。
首先将 SmsCodeAuthenticationSecurityConfig 注入进来,然后通过 http.apply(xxx) 添加进去。
1
2
3
4
5
6
7
8
9
10
11
12
13
14
15
16
17
18
19
20
21
22
23
24
25
26
27
28
29
30
31
32
@Configuration @EnableWebSecurity @EnableGlobalMethodSecurity(prePostEnabled = true) public class WebSecurityConfig extends WebSecurityConfigurerAdapter @Autowired private SmsCodeAuthenticationSecurityConfig smsCodeAuthenticationSecurityConfig; @Override protected void configure (HttpSecurity http) throws Exception http.apply(smsCodeAuthenticationSecurityConfig).and().authorizeRequests() .antMatchers("/sms/**" ).permitAll() .anyRequest().authenticated() .and() .formLogin().loginPage("/login" ) .defaultSuccessUrl("/" ).permitAll() .and() .logout().permitAll(); http.csrf().disable(); } @Override public void configure (WebSecurity web) throws Exception web.ignoring().antMatchers("/css/**" , "/js/**" ); } }
然后在 controller 中写一个读取验证码的接口,注意这个接口在 WebSecurityConfig 中要放行:
1
2
3
4
5
6
7
8
9
10
11
12
13
@RequestMapping("/sms/code") @ResponseBody public void sms (String mobile, HttpSession session) int code = (int ) Math.ceil(Math.random() * 9000 + 1000 ); Map<String, Object> map = new HashMap<>(16 ); map.put("mobile" , mobile); map.put("code" , code); session.setAttribute("smsCode" , map); logger.info("{}:为 {} 设置短信验证码:{}" , session.getId(), mobile, code); }
然后修改 login.html 页面,添加短信登录的内容:
注意这里的登录 Url /sms/login 是配置在 SmsAuthenticationFilter 中的 Url。
1
2
3
4
5
6
7
8
9
10
11
12
13
14
15
16
17
18
19
20
21
22
23
24
25
26
27
28
29
30
31
32
33
34
35
36
37
38
39
40
<!DOCTYPE html > <html lang ="en" > <head > <meta charset ="UTF-8" > <title > 登陆</title > </head > <body > <h1 > 登陆</h1 > <form method ="post" action ="/login" > <div > 用户名:<input type ="text" name ="username" > </div > <div > 密码:<input type ="password" name ="password" > </div > <div > <button type ="submit" > 立即登陆</button > </div > </form > <br > <form method ="post" action ="/sms/login" > <div > 手机号:<input type ="text" id ="mobile" name ="mobile" value ="jitwxs" > </div > <div > 验证码:<input type ="text" name ="smsCode" > <a href ="javascript:;" onclick ="sendSms()" > 获取验证码</a > </div > <div > <button type ="submit" > 立即登陆</button > </div > </form > <script > function sendSms ( window .location.href = '/sms/code?mobile=' + document .getElementById("mobile" ).value; } </script > </body > </html >
因此只是测试,所以页面懒得弄了,当你输入手机号(实际上就是用户名),点击获取验证码,页面会跳转出去,然后自己再按一下浏览器的后退键退回来。
在控制台就会打印当前用户的 sessionId,以及为哪一个手机号所申请的验证码。
当验证码输入错误时:
当获取验证码的手机号和登陆手机号不一致时:
成功登陆时,执行成功处理逻辑:


 wechat